This how-to article provides a detailed overview of Coe Co-Engineer feature and how to leverage its functionalities effectively.
Coe is a highly efficient Condence feature that makes monitoring industrial machines more straightforward, reducing the need for human involvement and expertise. Coe changes user’s workflow essentially from monitoring hundreds of trends to only monitor automated observations. Coe relentlessly monitors the device and provides Suggestions whenever it thinks something might be up. Coe provides visualized key performance indicator trends, known as Coe KPIs, for users to study the basis for Coe Suggestions or for users straight to use them for decision making. Coe has been proven to notice upcoming changes far beyond human users would be able to notice them.
Coe‘s performance is based on using learning algorithms to analyze Time Waveform samples taken from the monitored device to form the Coe KPIs. Coe forms a dynamic baseline from the past and monitors changes to the baseline.
Coe is generally an excellent choice when dealing with limited data sources, such as missing RPM or limited information about the monitored machine, such as bearing frequencies. Coe can also serve as a stand alone monitoring concept. By setting up only Coe you have an industrial level condition monitoring
Coe is usable with Condence Advanced and Condence Easy hardware options.
- Although Condence Advanced is a powerful tool for holistic machine condition monitoring, the tool needs an user. Coe is able to replace much of need for the human user by providing a systematic approach for monitoring even for less expert users.
- Condence Easy installations specially benefit from Coe. Coe is not affected by the processing limitations of Condence Easy sensors because Coe relies on the raw data. Coe brings out information related to bearings, lubrication, mechanical information, etc., that would not be followed by Condence Easy otherwise.
To access Coe, you must first enable the Coe feature for your device levels. Please check your organization-enabled licenced features to see if you have enabled Coe. If you do not have the Coe feature available and would like to get started on it, don’t hesitate to get in touch with Distence at support@distence.fi.
For more in-depth commercial knowledge about Coe, please refer to the Condence.io articles:
Coe – Co-engineer specialized in prescriptive maintenance
Industrial fan with a bearing failure – Detected by Condence Coe
Industrial gearbox with potential gear issue – Detected by Condence Coe
Setting up Coe
When initially starting to use Coe, you must first create your configurations for Coe to follow.
Head to the Device Manager and to the level you want to enable Coe to. Please remember that Coe is handed down along the hierarchy, so if you create Coe on the upper-most level, it will be available for all the below levels.
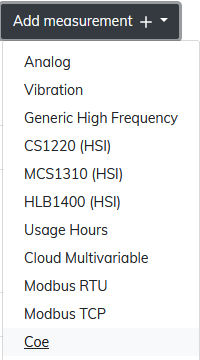
Once in the correct level, open the Measurements tab, select the Add measurement + icon, and choose Coe to continue. Please note that option Coe is unavailable until you have an active Coe license for your organization.
After selecting the Coe option, you are presented with the following Measurement configuration window:
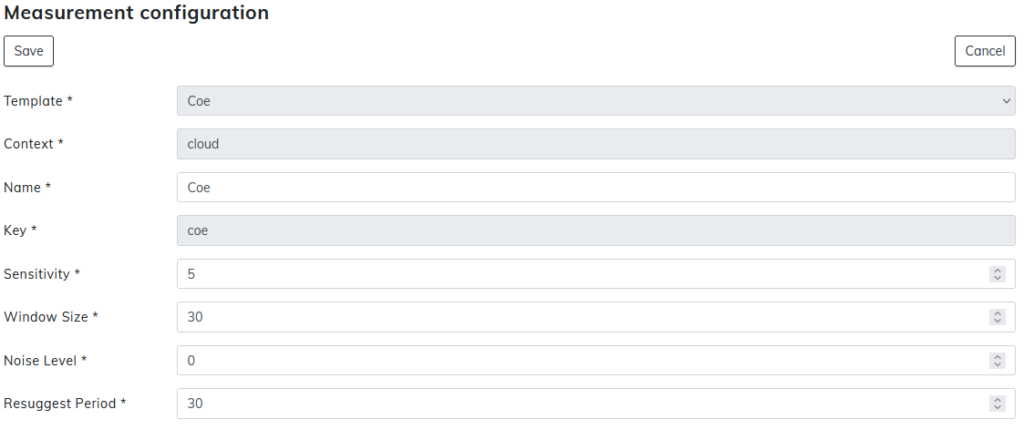
Template is set to Coe, since we are configuring Coe.
Context is always cloud with Coe.
Name is selectable by the user. Please note that the name only affects the Device Manager and is not visible in the Monitoring view in Condence.
Key, the unique identifier for measurement, can not be changed and is defaulted to Coe.
Sensitivity lets you set the sensitivity of how easily Coe gives suggestions. Sensitivity can differ between 1 and 10, where setting 1 makes Coe trigger the suggestions more lightly, and 10 makes the trigger heavier. Sensitivity defaults to setting 5, which is recommended as a starting point.
Window Size lets you choose the number of time waveform samples Coe needs to analyze before determining the device’s default levels, which Coe uses as the baseline. Window Size defaults to 30 samples, which is recommended as a valid starting point.
Noise Level filters out idle periods where the device is not running. It is useful when the RPM minimum condition is unavailable, as well as with Condence Easy installations. Noise level defaults to 0.
Resuggest Period lets you pick a period of days the Coe will keep between samples so that it will ignore the same issue. By default, the Resuggest Period is 30 days.
When you are ready with the configurations, press Save and continue. Afterwards, head to the Setup tab and create your Cloud setup with Coe measurements.

After finishing your Coe measurements and making the setups, you may publish them to your selected devices. If you created Coe setups on upper levels, all the devices under the said level should be able to use the same configurations. Even though Coe measurements and setups can be made available for all the devices in the same hierarchy, they still need to be published for each device individually. Publish Coe and continue.
Please keep in mind that for Coe to accurately give predictions, the window size in your Coe measurement, needs to be filled to provide suggestions. Please check your measurements to determine when this will be approximately.
Coe User Interface
Suggestions
Coe Suggestion is a verbal outcome of the analysis formulated from time waveform by Coe. Suggestions are given based on deviations on potential issues and magnitude of deviation. Suggestions are observations for the Condence user as a starting point for further analysis and decision making. Users can confirm the observation from the Coe KPI-trends, other metrics as well as from the timewave data sample. Idea is not to make further studies of all the Coe Suggestions. The best use case is to follow the Coe Suggestions and the development of the story they make and react, when clearly the Coe Suggestions point to a developing issue.
Coe can be used without suggestions by just monitoring Coe KPI trend metrics.
Open your Monitoring view in Condence. When you have an active Coe feature, a small symbol should appear next to your search toolbar on the right side.

Pressing the Coe symbol opens the Coe User Interface, later called Coe UI, in the how-to article. In this UI, you will work with Coe most of the time.
Please note that your Coe UI will be empty until Coe can determine the default levels on your device. This data-gathering period is set up in your Window Size section.
In Coe UI, there are six columns which all serve a different purpose:
- Type
- The Type tells the user what kind of action Coe recommends. It can be one of the following:
- Inspect
- Follow
- Observe
- Corrective service
- Preventive service
- The Type tells the user what kind of action Coe recommends. It can be one of the following:
- Magnitude
- Magnitude tells the user how severe suggestions Coe has picked up. The magnitude is ranked from 1 to 5, where 1 (the least severe) is marked as yellow, and 5 (the most severe) is marked as red.
- Time
- The Time column tells the user when Coe picked up the issue and gave the suggestion.
- Device
- The Device column tells what device this suggestion is about. This column is not visible when looking at Coe UI on a device level.
- Clicking the device name opens a link to that particular device for accessible transit at said level.
- Target
- The Target is the data measurement point in the device, e.g., Motor NDE.
- Clicking the Target opens up a Coe KPIs trend view for inspection.
- Suggestion
- The Suggestion field gives a written suggestion on what Coe thinks should be done about this issue.
- Clicking on the down-pointing arrow on the right of the Suggestion row opens up more specified details on what Coe gives as a suggestion.
Coe KPI
In addition to Coe making suggestions for the users, it also creates trend metrics to follow. These trends are derived from time waveform samples. Coe makes suggestions based on these trend metrics, and pressing the target in the Coe UI always brings up the relevant Coe KPI from which Coe drew suggestions.
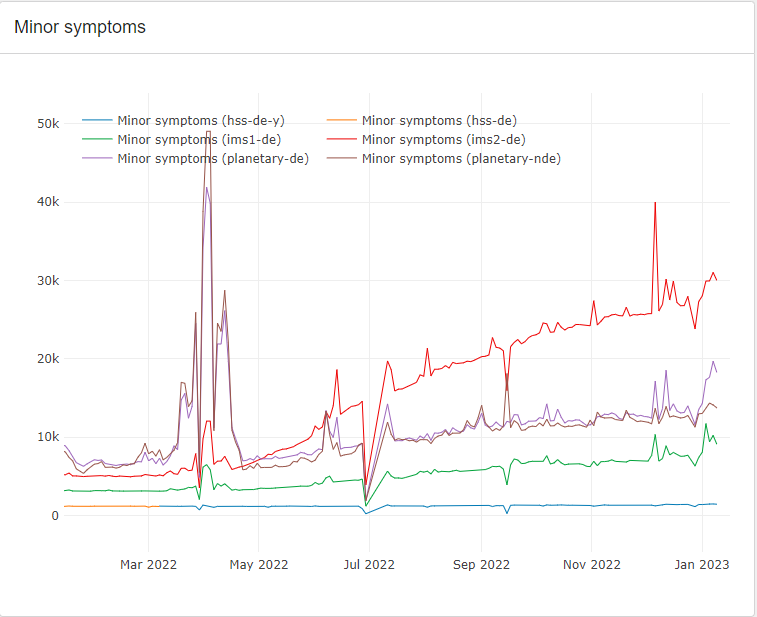
The trend windows that Coe creates can be categorized into five different groups. Most groups make multiple trend metrics to indicate different magnitudes of indicators. The trend windows are:
- Generic indicators of potential issues:
- ‘Minor symptoms
’ - ‘Emerging symptoms
‘ - ‘Progressed symptoms
’ - ‘Major symptoms
’
- ‘Minor symptoms
- Bearing issue indicators:
- ‘Bearing score minor
’ - ‘Bearing score progressed
’ - ‘Bearing score severe
’
- ‘Bearing score minor
- Mechanical structure such as looseness, misalignment, and imbalance:
- ‘Mechanical structure progressed
‘ - ‘Mechanical structure severe
’
- ‘Mechanical structure progressed
- Rotating parts such as blades, gears, and vanes:
- ‘Rotating parts progressed
’ - ‘Rotating parts severe
’
- ‘Rotating parts progressed
- Lubrication or greasing issues:
- ‘Friction’
Coe makes suggestions based on the aggravated results you can see in these trend windows. For example, should the ‘Bearing score progressed‘ window show signs of elevated metrics, Coe might suggest following the bearings closer and giving the suggestion an appropriate magnitude based on the severity of the findings.