This article follows steps on how to add Cloud Multivariable measurement to your terminal setup via Device Manager. If you require help locating your preferred group of devices, please refer to the article Locating your device.

From the dropdown menu, select Cloud Multivariable.

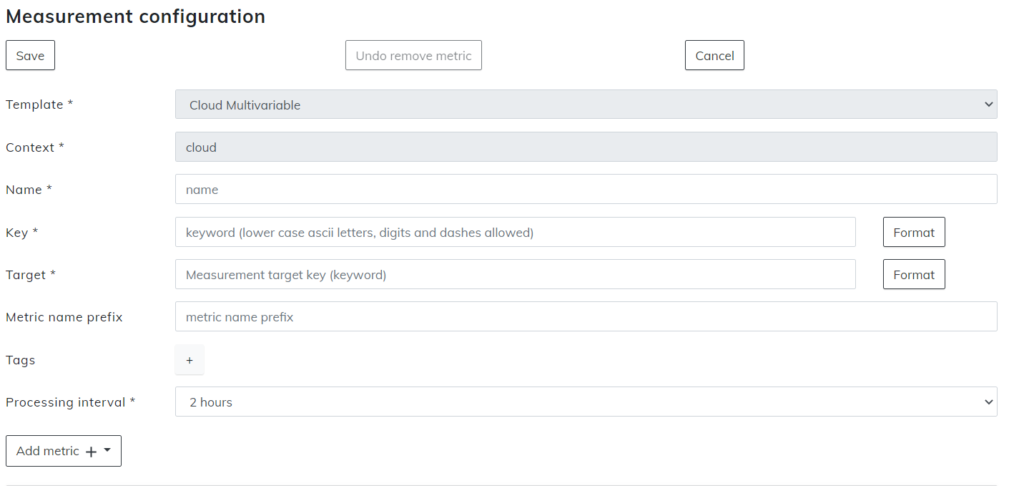
Measurement configuration
Sections with asterisk * are mandatory.
Template and Context can not be changed, so they are greyed out. At Template, it should say Cloud Multivariable, and at Context, it should be Cloud.
Name is what the measurement will be known from here on out. It is recommended to use the name that matches the measurement to be easy to recognize. This name will not be shown on the monitoring view and is purely for administrative purposes.
Key is the unique identification for the measurement. On this hierarchy level, the Key needs to be unique and can’t overlap with any other. As with the name, using the Key that matches the intended measurement is highly recommended. Key requires only the use of lower case ASCII letters, digits, and dashes instead of spaces.
Target needs to match the target that is used in the measurement you wish to apply Cloud multivariable into. For example, if you want to use the Cloud multivariable for 10-1000Hz metrics that have a target motor, you need to insert a motor into this Target also. You can have metrics from multiple different targets, but they need to be added separately in the following sections.
Processing interval has one option in the dropdown menu, which is 2 hours. Cloud Multivariable is updated once per two hours, so this is not changeable.
Select Add metric + and select Input to continue with this article.
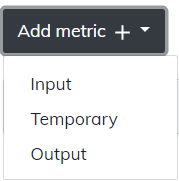
Input variable
From the Input, we may add metrics that we wish to use as the basis for Health Index. Note that all the metrics you want to add need to be added separately, so you may need to add the Input variable as many times as required.
Template is not changeable.
Key needs to be unique within the Health Index measurement. Note that in the Input variable, the key is not used anywhere outside of this Input. The name that is used later to refer to this Input variable is Variable id.
Input device should remain empty in most cases. If you wish to get metrics from another device, you can write the device key of the said device here so metrics from another device can be used here.
Input target should be used if you have multiple metrics with the same name. For example, you have a case where you have 2 x BPFO metrics measuring with the same name. One is on the target motor-de and the other on motor-nde. By writing motor-de in the input target, the Health Index knows where to search for the correct measurement. If you only have a metric with one name, you may also leave this part empty, as the Health Index will search with the name.
Input metric is the Key to the metric we want to use in the Health Index. For example, we have a metric with the key bpfo-motor. If we’re going to add the said metric to Health Index, we will write it here.
Variable id is the name of the Input. This name is used later in the Temporary variable and Output sections. This name should be unique and represent what the metric is. In many cases, the variable name is the same as the previously entered Key.

We can also check the box for Apply aggregation to enter more details.
Aggregations time interval is used to set when the Health Index piles the metrics used. The Processing interval of the Health Index is 2 hours, so this is recommended to be kept over 2 hours.
Function lets you determine how you want your Health Index measurement to be aggregate. Options are:
- Average
- Minimum
- Maximum
- Sum
- Standard deviation
- Linear weighted average
- Change from previous value


Temporary variable
When you have added all the input variables that you want, we can go to the next section: Temporary. Note that the Temporary variable is added from the Add Metric +.
Temporary variable is not visible anywhere besides in this same Health Index measurement. A temporary variable is used to combine multiple keys into one so that the Output formula used later is easier to read.
Key should be unique, as always.
Next, we will cover variable id and equation at the same time:
Hypothetically let’s say we have inserted four inputs previously. These inputs are for the bearing envelope. Instead of writing all of these metrics in the output section, we can combine these envelope metrics into one here.
The four metrics, in our case, are bpfi_env, bpfo_env, bsf_env, and ftf_env.
Into the variable id, we will write the name we want to use for the envelope formula. In the example case, we used the same name as the Key. This id is used in the output section later.
Equation is where we will enter our mathematics. When just adding multiple metrics into one, this is simply an addition.
bpfi_env + bpfo_env + bsf_env + ftf_env
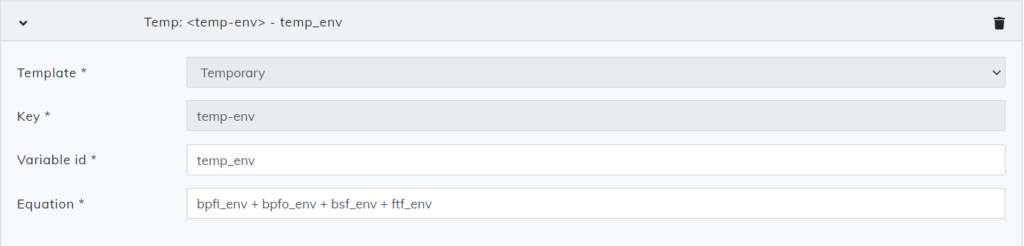
Now when we want to add this specific equation later, we may write temp_env, and it will use this formula. Example: temp_env + 2 would actually read as (bpfi_env + bpfo_env + bsf_env + ftf_env) + 2. When comparing the two, the upper example is highly more readable.
Please note that this was just an example case.
You may add as many temporary variable equations as you want. Let’s say you want to add also acceleration and velocity metrics; you may follow the same steps as above for these metrics. Instead of writing every key side by side, the final equation could look more like temp_env + temp_acc + temp_velo.
Using temporary is not mandatory, but we recommend using it to keep everything more readable.
Output
Now that we have selected the input variable metrics we want to have in the Health Index and have compiled some of them together with the temporary variables, it is time to decide how we would piece them together and show them in the Monitoring view.
Name will be shown as the title in the Monitoring view. Select the best title to represent the new metric to be shown.
Key is, again, unique for this level. The key in the Output section is the most important Key in the Health Index, as this Key is the one that will identify the Health Index in the system.
Equation is where we will combine the metrics we have input. The most simple way to add these equations would be basically a + b + c + d …, where every letter represents the name of the metric that we inputted. That would look hard on the eyes, so we used a temporary variable. Combining formulas on temporary variable changes this:
bpfi_env + bpfo_env + bsf_env + ftf_env + bpfi_acc + bpfo_acc + bsf_acc + ftf_acc + bpfi_velo + bpfo_velo + bsf_velo + ftf_velo
to this:
temp_env + temp_acc + temp_velo
As previously explained, temp_env contains envelope inputs and so on.
Quality is selected to show what quality our metric should be. In our case, we should choose value as we have multiple different metrics. If you are compiling numerous same qualities, you should select that one.
Unit is selected to show what unit the quality is. For example, temperature could be either C, F, or K. Value has no other option.

Setup
After measurements are done, head to the Setup section. This can be selected from the upper row.
When you are in the setup section, select Add setup and Cloud measurement setup.
In the Key section, write the name you want to use for this setup.
Measurements have a list of available measurements. Select the name that was used for your Usage hours metrics.
Press Save and continue.
For a more in-depth look at how to add Setups, you may look at the article Setups.
Publish the setup
Head to the Device status tab. This is selectable from the upper menu row.
Below the terminals tab, you can see the Select cloud setup dropdown menu. The Key that was used in the setup will be shown here. Please select your preferred setup and click on it.
Press publish, and your Cloud Multivariable (Health Index) setup will be published to your terminal.
For a more in-depth look at how to publish Setups, you may look at the article Publishing the Setup.