This how-to article provides a detailed overview of the Point of Interest feature and how to leverage its functionalities effectively.
The purpose of this feature is to make notes for your future self and other users and attach information to the history of the machine. Point of Interest enables tying a notification to time, device, data source or metric, and it is a visible point and hover message in all relevant trend widgets. Usual uses for Points of Interest are, e.g. user observations & analyses, causes for anomalies and maintenance activities. This optional, licenced, fleet-level feature is available for all Condence hardware options and includes the Lifeline feature.
Point of Interest events are visible to all the users who have access to the device level at which Point of Interest was made.
To use the Point of Interest feature, you must first enable it for your fleet level. Please check your organization-enabled licenced features to see if you have Point of Interest enabled. If you do not have the feature available and would like to get started on it, don’t hesitate to contact Distence at support@distence.fi.
For more knowledge about the Lifeline feature, please refer to the article How to use the Lifeline -article.
Creating a Point of Interest
Where to create a Point of Interest
There are three places you can create your Point of Interest in Condence.

- To create a Point of Interest in the Monitoring view, press the Create Point of Interest symbol, a small pen icon, next to the Search tool
- Open the Trend Window to full screen, press the Toggle Points of Interest button, and then click on the Trend Metric to the point you wish to create the Point of Interest.
- Open the Lifeline to full screen and press the Create Point of Interest button.
It is to be noted that either way takes you to the same view to create a similar Point of Interest. The difference is just preference or convenience when making a Point of Interest.
How to create a Point of Interest
When clicking the Point of Interest button, you are greeted with the Create New Point of Interest window. This is where you will create your Point of Interest. Please note that all the fields with the asterisk * symbol must be filled out.
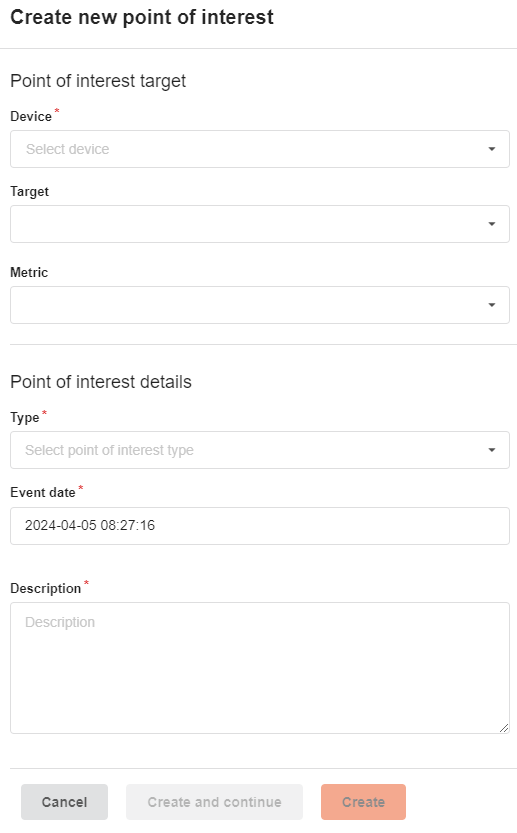
Point of Interest Target
- Device*
- The Device field lets the user select the device to which the Point of Interest will be addressed. If you are creating your Point of Interest in e.q., a Site level, you must select the correct device where to insert your findings. When, however, you are creating a Point of Interest at a device-specific level, the device level you are in automatically selected for this field.
- Target
- The Target is the data measurement point in the device, e.g., Motor NDE.
- Select the proper target of your device so your Point of Interest will be visible on all the Trend Metrics with the same target. For example, if you want your Point of Interest to concern Motor NDE and be visible on every Trend Metric with the same target, please select Motor NDE from the target list.
- Target is not a mandatory field.
- Metric
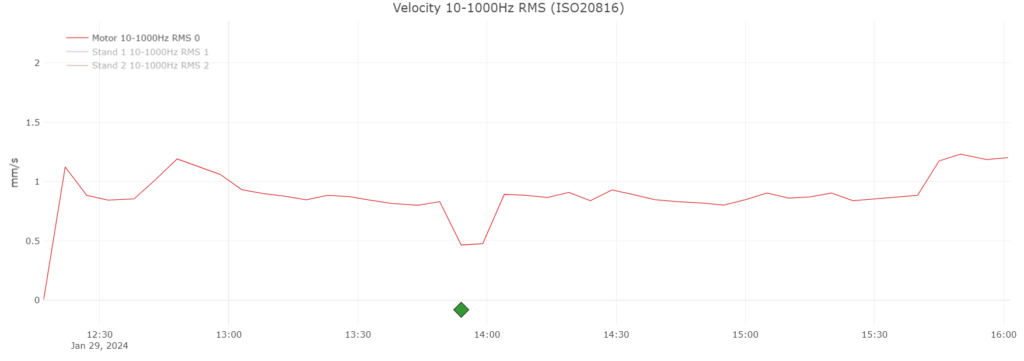
- The Metric field has the user choose a metric about which the Point of Interest is concerned. For example, if you have seen an anomaly in 10-1000Hz Velocity, you could select that metric for this field, and the Point of Interest would be visible on the Trend Windows that display this particular metric.
- Metric is not a mandatory field.
Point of interest details
- Type*
- The Type field allows you to select the correct type of point of interest you are creating. This helps you track what kind of Point of Interest was noted.
- The Type list is as follows:
- Note
- Note should be used when taking notes. This is useful as it helps you keep all your remarks on the same device level.
- Observation
- Observation should be used when you have noticed something that requires / might require attention later.
- Suggestion
- Suggestions should be used when you want to suggest what should be done about a particular subject.
- Planned Action
- Planned Action is used when you have planned some action to be done later. Writing down the Planned Action helps other users see what will happen down the road.
- Action
- Action is used when you have done something, e.g., lubricating the device. Writing down the action done makes it easier to keep track of all the actions that are/were done for this device.
- Note
- Event date*
- The Event data field is used to select the exact date and time that you wish to insert your Point of Interest.
- Description*
- The Description field is where you will insert all your manual notes. In order for your descriptions to be as precise as possible, please include all the details that led you to create a Point of Interest. It is usually better to be more detailed than not.
After you have created your Point of interest, you may either press Create, so your Point of Interest will go live and will be visible, or you may press Create & continue, so your Point of Interest will go live and you may continue making more. The same settings will be left in the previous fields, so you do not have to write everything again if you have more observations.
How to monitor Points of Interest
Point of Interest events are observable in two places: your relevant Trend Widgets and your Lifeline, should you have the necessary licensed feature available.
Trend Widgets
First, open your Trend Widget to view the full screen from the Toolbar. In this window, you will see your Points of Interests. However, when you first open this window, the Points of Interest are not visible. Hover over your Toolbar in this view, and select the right-most icon in the Toolbar titled Toggle Points of Interest. By clicking this icon, you are now greeted with the Point of Interests you have created.
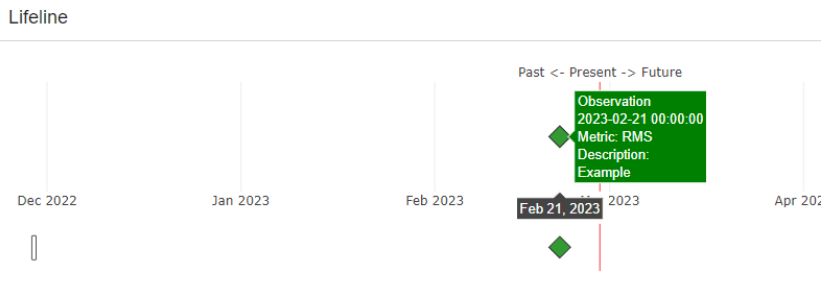
Lifeline
Your Point of Interest events are also visible in your Lifeline window. The Points of Interest will be marked with the same green square icon in this window. With the Lifeline, you do not need to enable the Point of Interest view in any compared to the Trend Widget, so all your events will be visible on your Lifeline after creating Point of Interest.
Details & Editing
When hovering over the Point of Interest, you may see the details written for it.
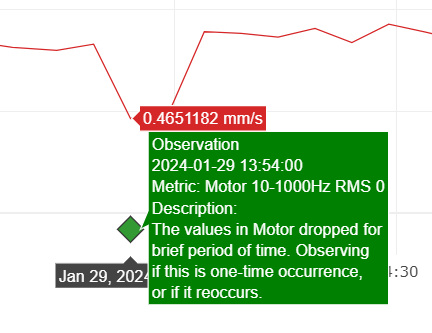
Clicking on the Point of Interest opens it up to full screen for observation.
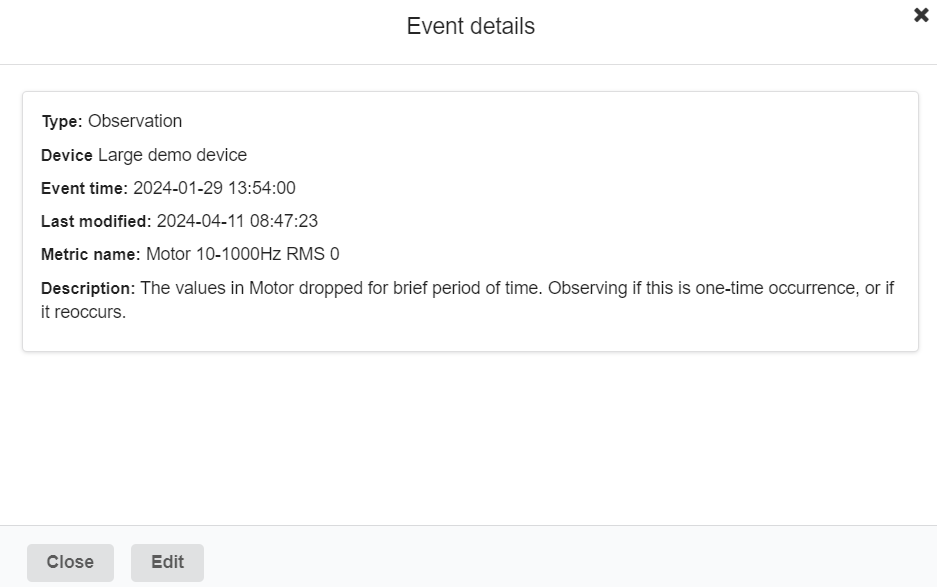
The information is observable in this view to the utmost detail. You can edit or delete this Point of Interest in the edit view.
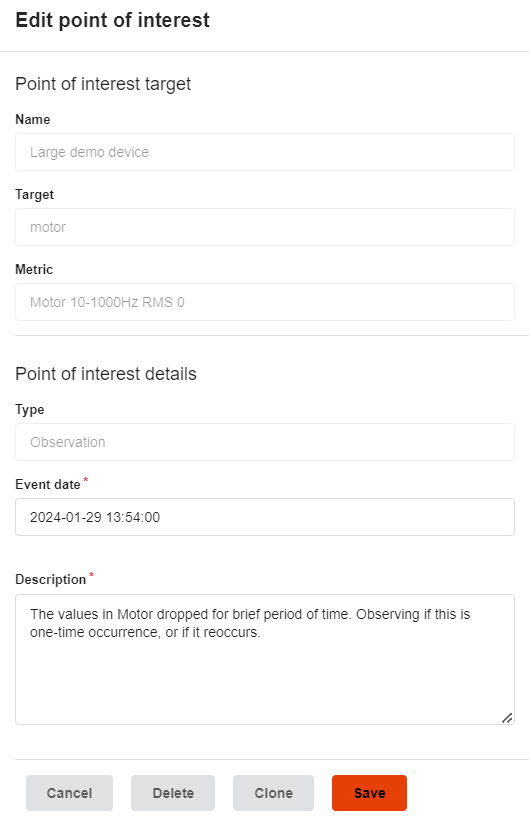
Point of Interest Target fields are not changeable after the initial Point of Interest is created. You can edit the Event date and the Descriptions to your liking afterwards.
Should you want to make a similar Point of Interest, you may press Clone to open the Create Point of Interest view with the fields filled with the exact copy of this one.
You can also delete the Point of Interest by clicking the Delete button. This decision can not be reversed.